
1. Hadoop初识
1.1. Hadoop1.x 与 2.x的区别
如首图所示,在1.x中MapReduce负责计算和资源调度,在2.x中,将资源调度的功能从MapReduce中分离出来,增加了Yarn模块。
1.2. HDFS架构

- NameNode: 存储文件的元数据,如文件名,文件目录结构,文件属性(生成时间、副本数、文件权限),以及每个文件的块列表和块所在的DataNode等
- DataNode: 在本地文件系统存储文件块数据,以及块数据的校验和
- Secondary NameNode:用来监控HDFS状态的辅助后台程序,每隔一段时间获取HDFS元数据的快照
1.3. Yarn架构

Resource Manager:的主要功能
- 处理客户端请求
- 监控NodeManager
- 启动或监控ApplicationMaster
- 资源的分配与调度
NodeManager:的主要功能
- 管理单个节点上的资源
- 处理来自Resource Manager的命令
- 处理来自ApplicationMaster的命令
ApplicationMaste:
- 负责数据的切分
- 为应用程序申请资源与分配给内部的任务
- 任务的监控与容错
Container
Container是Yarn中的资源抽象,它封装了某个节点上的多维度资源,如内存、CPU、磁盘、网络等。
1.4. MapReduce
MapReduce将计算过程分为两个阶段:Map和Redece
1) Map阶段并行处理输入数据
2) Reduce阶段对Map结果进行汇总
2. HDFS
使用场景:适合一次写入,多次读出的场景,且不支持文件修改。适合用来做数据分析。
2.1. 优缺点
2.1.1. 优点
- 高容错性
- 数据自动保存多个副本,通过增加副本的形式提高容错性。
- 某一个副本丢失后,会自动创建新的副本,保证副本的数量
- 适合处理大数据
- 数据规模:能够处理GB,TB甚至PB级的数据
- 文件规模:能够处理百万规模以上的文件数量
- 可在廉价机上构建
2.1.2. 缺点
- 不适合低延时数据访问,比如毫秒级
- 无法高效的对大量小文件进行存储
- 存储小文件会占用NameNode大量的内存来存储文件目录和块信息。
- 小文件存储的寻址时间会超过读取时间
- 不支持并发写入,文件随机修改
- 一个文件只能有一个写,不允许多个线程同时写
- 仅支持数据追加(append),不支持文件随机修改
2.2. 组成架构
- NameNode: (master)
- 管理HDFS的名称空间
- 配置副本策略
- 管理数据块(Block)映射信息
- 处理客户端读写请求
- DataNode: (slave)
- 存储实际的数据块
- 执行数据块的读写操作
- client
- 文件切分。文件上传HDFS的时候,Client将文件切分成多个Block,然后上传。
- 与NameNode交互,获取文件的位置信息。
- 与DataNode交互,读取或写入数据。
- Client提供一些命令管理HDFS
- 通过命令访问HDFS,如增删查改等
- Secondary NameNode:并非NameNode的热备。当NameNode挂掉的时候并不能马上替换NameNode并提供服务
- 复制NameNode,分担其工作,如定期合并Fsimage和Edits,并推送给NameNode
- 在紧急情况下,可辅助恢复NameNode
2.2.1. 文件块大小(面试题)
通过配置参数 dfs.blocksize来确定,默认大小在Hadoop2.x中是128M,老版本中是64M。这个大小是根据寻址时间和硬盘写入速度确定的,最佳状态是寻址时间是传输时间的1%。按寻址时间10ms,传输速度100M/s来计算,块大小需为100M。
块设置很小,就会增加寻址时间;如果太大,传输数据的时间会明显大于寻址时间。
2.3. HDFS API
2.3.1. 环境配置
新建mvn工程
添加依赖
在https://mvnrepository.com/artifact/org.apache.hadoop/hadoop-client/2.9.2 选择与部署hadoop版本相同的mvn依赖,并添加依赖
1
2
3
4
5
6
<!-- https://mvnrepository.com/artifact/org.apache.hadoop/hadoop-client -->
<dependency>
<groupId>org.apache.hadoop</groupId>
<artifactId>hadoop-client</artifactId>
<version>2.9.2</version>
</dependency>配置log4j
新建log4j.properties文件
把下面的内容添加到文件中
1
2
3
4
5
6
7
8
9
10
11
12
13
14
15
16
17
18
19
20
21
22
23
24
### 设置###
log4j.rootLogger = info,stdout,D,E
### 输出信息到控制抬 ###
log4j.appender.stdout = org.apache.log4j.ConsoleAppender
log4j.appender.stdout.Target = System.out
log4j.appender.stdout.layout = org.apache.log4j.PatternLayout
log4j.appender.stdout.layout.ConversionPattern = [%-5p] %d{yyyy-MM-dd HH:mm:ss,SSS} method:%l%n%m%n
### 输出DEBUG 级别以上的日志到=E://logs/error.log ###
log4j.appender.D = org.apache.log4j.DailyRollingFileAppender
log4j.appender.D.File = ./logs/log.log
log4j.appender.D.Append = true
log4j.appender.D.Threshold = DEBUG
log4j.appender.D.layout = org.apache.log4j.PatternLayout
log4j.appender.D.layout.ConversionPattern = %-d{yyyy-MM-dd HH:mm:ss} [ %t:%r ] - [ %p ] %m%n
### 输出ERROR 级别以上的日志到=E://logs/error.log ###
log4j.appender.E = org.apache.log4j.DailyRollingFileAppender
log4j.appender.E.File =./logs/error.log
log4j.appender.E.Append = true
log4j.appender.E.Threshold = ERROR
log4j.appender.E.layout = org.apache.log4j.PatternLayout
log4j.appender.E.layout.ConversionPattern = %-d{yyyy-MM-dd HH:mm:ss} [ %t:%r ] - [ %p ] %m%n
测试
1
2
3
4
5
6
7
8
9
10
11
12
13
14
15
16
17
18
19
20
21
22
23
24
25
26
27
public class HDFSClient {
public static void main(String[] args) {
HDFSClient h = new HDFSClient();
h.test();
}
// 0 一个简单的测试
public void test() {
Configuration conf = new Configuration();
conf.set("fs.defaultFS", "hdfs://localhost:9091");
FileSystem fs = null;
try {
// 1 获取hdfs客户端对象
fs = FileSystem.get(conf);
// 2 在hdfs上创建路径
fs.mkdirs(new Path("/1109/dashi"));
// 3 关闭资源
fs.close();
} catch (IOException e) {
e.printStackTrace();
}
System.out.println("over");
}
}执行结果
1
2
3
$ hadoop fs -ls /
Found 1 items
drwxr-xr-x - bruce supergroup 0 2020-11-10 10:56 /1109
2.3.2. 上传文件
1 | // 1 文件上传 |
执行结果
1 | $ hadoop fs -ls / |
2.3.3. 下载文件
1 | // 2 文件下载 |
2.3.4. 文件删除
1 | // 3 文件删除 |
2.3.5. 文件信息打印
1 | // 4 查看文件信息 |
2.4. HDFS I/O流操作
2.4.1. 上传文件
1 | // 上传文件 |
2.4.2. 下载文件
1 | // 下载文件 |
2.4.3. 读取部分文件
1 | //读取部分内容 |
2.5. HDFS数据流
2.5.1. 写入流程
2.5.1.1. 数据写入

2.5.1.2. 副本存储节点选择
文档版本 - 3.2.1
在副本数量为3的情况下:
- 如果writer在一个datanode上,那么第一个副本就存储在这个datanode上,否则选择与writer在同一个机架的随机节点。
- 第二个节点选择在不同机架的一个datanode
- 第三个节点选择在不同机架上的与第二个节点不同的datanode
如果复制因子大于3,则随机决定第4个副本和后面的副本的位置,同时保持每个机架的副本数量低于上限(基本上是(副本数 - 1) /机架+ 2)。

因为NameNode不允许数据节点拥有同一个块的多个副本,所以创建的副本的最大数量是当前数据节点的总数。
2.5.1.3. 节点距离的计算
在HDFS读写数据的过程中,NameNode会选择距离待上传/下载数据最近距离的Datanode。
节点距离 = 两个节点到达最近共同祖先的距离总和。

distance(00, 00) = 0 (同一节点上的进程)
distance(00, 01) = 2 (同一机架上的不同节点)
distance(00, 05) = 4 (同一数据中心,不同机架上的节点)
distance(00, 15) = 6 (不同数据中心的节点)
2.5.2. 读取流程

2.6. NameNode和Secondary NameNode
2.6.1. 工作机制
NameNode的元数据存放在内存中,为了防止断电丢失,在磁盘中存一个备份FsImage。
这样带来新的问题,如果在内存中更新的同时更新fsimage,就会导致效率过低,如果不更新,就会发生一致性问题,一旦NameNode断电,就会产生数据丢失。因此,引入Edits文件(只进行追加操作,效率很高)。每当元数据有更新或添加元数据时,修改内存中的元数据并追加到Edits中(先更新Edits再更新内存)。这样,一旦NameNode断电,可以通过fsimage和Edits的合并,合成元数据。
如果长时间添加数据到Edits中,会导致文件数据过大,效率降低,一旦断电,恢复元数据需要的时间很长。因此需要定期进行fsimage和Edits的合并。合并操作由Secondary NameNode完成。

tips[hdfs-default.xml]
- 定时时间默认3600秒
- edits中的数据大于100万条,每隔60秒检查一次。
2.6.2. Fsimage 和 Edits
1 | /tmp/hadoop-bruce/dfs/name/current$ ls |
- fsimage文件:HDFS文件系统元数据的一个永久性检查点,其中包括HDFS文件系统的所有目录和文件idnode的序列化信息。
- edits文件:存放HDFS文件系统的所有更新操作的路径,文件系统客户端执行的所有写操作首先会被记录到edits文件中
- seen_txid文件:保存的是一个数字,就是最后一个edits的数字
- 每次namenode启动时都会将fsimage文件读入内存,加载edits里面的更新操作,保证内存中的元数据信息是最新的、同步的,可以看成namenode启动的时候就将fsiamge和edits文件进行了合并。
在hdfs中新建目录
1 | hadoop fs -mkdir /zhao |
查看操作日志
1 | /tmp/hadoop-bruce/dfs/name/current$ hdfs oev -p XML -i edits_inprogress_0000000000000000005 -o ed.xml |
1 |
|
2.6.3. NameNode多目录配置
修改hdfs-site.xml
1 | <property> |
作用:
相当于给Namenode增加了备份
2.7. Datanode(面试重点)
2.7.1. 工作机制

- 一个数据块在Datanode上以文件形式存储在磁盘上,包括两个文件,一个是数据本身,一个是元数据包括数据块的长度,块数据的校验和,以及时间戳
- Datanode启动后向NameNode注册,通过后,周期性(1小时)的向Namenode上报所有块的信息
- 心跳3秒一次,心跳返回结果带有Namenode给该Datanode的命令,如复制块数据到另一台机器,或删除某个数据块。如果超过10分钟没有收到某个Datanode的心跳,则认为该节点不可用。
- 集群运行中可以安全加入或退出一些机器
2.7.2. 数据完整性
- 当Datanode读取Block的时候,它会计算CheckSum
- 如果计算后的CheckSum,与创建时值不一样,说明Block已经损坏
- Client读取其他Datanode上的Block
- Datanode在其文件创建后周期验证CheckSum
2.7.3. 白名单&黑名单
白名单
白名单中添加的节点可以被Namenode管理。
操作步骤:
1) 新建hosts文件 dfs.hosts,并在文件中添加允许的主机名
2) 在hdfs-site.xml中添加配置
1
2
3
4<property>
<name>dfs.hosts</name>
<value>dfs.hots path</value>
</property>3) 配置分发
1
$ xsync hdfs-site.xml
4) 刷新Namenode
1
$ hdfs dfsadmin -refreashNodes
5) 更新ResourceManager节点
1
$ yarn rmadmin -refreashNodes
6) 如果数据不平衡,可令再平衡
1
$ ./start-balancer.sh
黑名单
黑名单中的主机会被强制下线。
操作步骤:
1) 创建黑名单文件 dfs.hosts.exclude ,并添加主机名
2) 在hdfs-site.xml 中添加配置
1
2
3
4<property>
<name>dfs.hosts.exclude</name>
<value>dfs.hots.exclude path</value>
</property>3) 配置分发
1
$ xsync hdfs-site.xml
4) 刷新Namenode
1
$ hdfs dfsadmin -refreashNodes
5) 更新ResourceManager节点
1
$ yarn rmadmin -refreashNodes
2.7.4. Datanode多目录配置
修改hdfs-site.xml
1 | <property> |
作用:
将数据分开存储,例如第一个文件存储在data1,第二个文件存储在data2
2.8. HDFS 2.X新特性
2.8.1. 集群将数据拷贝
distcp命令
1 | hadoop distcp hdfs://hadoop102:9000/user/hello.txt hdfs://hadoop103:9000/user/hello.txt |
2.8.2 小文件存档
每个文件均按块存储,每个块的元数据存储在Namenode的内存中,因此HDFS存储小文件会非常低效。因为大量的小文件会耗尽NameNode的内存。但是存储小文件所需的磁盘容量与数据块大小无关,例如数据块的大小为128M,文件大小为1M,那么实际的存储是使用1M的磁盘空间。
解决方法之一
HDFS存档文件或HAR文件,是一个更高效的文件存档工具,它将文件存入HDFS块中,在减少NameNode内存使用的同时,允许对文件进行透明访问。具体来说,HDFS存档文件对内是一个一个的独立文件,对NameNode而言却是一个整体,减少了NameNode的内存
归档:
1 | $ hadoop archive -archiveName NAME.har -p <parent path> <src>* <dest> |
查看归档:
1 | $ hadoop fs -ls -R har:///<dest> |
2.8.3. 回收站
- fs.trash.interval=0, 0表示禁用回收站,其他值表示文件的存活时间
- fs.trash.checkpoint.interval=0,检查回收站的间隔时间。0表示与fs.trash.interval的值相等。
- fs.trash.checkpoint.interval <= fs.trash.interval
2.8.4. 快照
快照相当于对目录做一个备份。并不会立即复制所有文件,而是指向同一个文件。当写发生时,才会产生新文件。
3. MapReduce
一个完整的MapReduce程序在分布式运行时有三类实例进程:
- MrAppMaster: 负责整个程序的过程调度及状态协调
- MapTask: 负责Map阶段的整个数据处理流程
- ReduceTask: 负责Reduce阶段的整个数据处理流程
3.1. 优缺点
- 优点
- 易于编程,容易编写分布式程序
- 良好的扩展性,增加机器可增加计算能力
- 高容错性,一台机器挂了hadoop会将任务转移到另一个节点
- 适合PB级以上数据的离线运算
- 缺点
- 不擅长实时计算
- 不擅长流式计算
- 不擅长有向图(DAG)计算
3.2. 编程思想

3.3. 编程规范
用户编写的程序分成三个部分: Mapper、Reducer、Driver
Mapper阶段
- 用户自定义的Mapper要继承父类
- Mapper的输入数据是KV对的形式(KV的类型可自定义)
- Mapper中的业务逻辑写在map()方法中
- Mapper的输出数据是KV对的形式(KV的类型可自定义)
- map()方法(MapTask进程)对每一个<K,V>调用一次
Reducer阶段
- 用户自定义的Reducer要继承父类
- Reducer的输入数据类型对应Mapper的输出数据类型,也是KV
- Reducer的业务逻辑写在reduce()方法中
- ReduceTask进程对每一组相同K的<K,V>组调用一次reduce()方法
Driver阶段
相当于Yarn集群的客户端,用于提交我们的程序到Yarn集群,提交的是封装了MapReduce程序相关运行参数的job对象。
3.4. WordCount 案例

Mapper
1
2
3
4
5
6
7
8
9
10
11
12
13
14
15
16
17
18
19
20
21
22
23
24
25
26
27
28
29
30
31
32
33
34package mapreduce.wordcount;
import org.apache.hadoop.io.IntWritable;
import org.apache.hadoop.io.LongWritable;
import org.apache.hadoop.io.Text;
import org.apache.hadoop.mapreduce.Mapper;
import java.io.IOException;
/**
* map阶段
* KEYIN 输入数据的Key
* VALUEIN 输入数据的value
* KEYOUT 输出数据的key, 同时也是Reduce阶段的输入
* VALUEOUT 输出数据的value, 同时也是Reduce阶段的输入
*/
public class WordCountMapper extends Mapper<LongWritable, Text, Text, IntWritable> {
private Text k = new Text();
private IntWritable v = new IntWritable(1);
protected void map(LongWritable key, Text value, Context context) throws IOException, InterruptedException {
// 1 获取一行
String line = value.toString();
// 2 切割单词
String[] words = line.split(" ");
// 3 循环写出
for (String word: words) {
k.set(word);
context.write(k, v);
}
}
}Reducer
1
2
3
4
5
6
7
8
9
10
11
12
13
14
15
16
17
18
19
20
21
22
23
24
25package mapreduce.wordcount;
import org.apache.hadoop.io.IntWritable;
import org.apache.hadoop.io.Text;
import org.apache.hadoop.mapreduce.Reducer;
import java.io.IOException;
public class WordCountReducer extends Reducer<Text, IntWritable, Text, IntWritable> {
private IntWritable v = new IntWritable();
protected void reduce(Text key, Iterable<IntWritable> values, Context context) throws IOException, InterruptedException {
int sum = 0;
// 1 累加求和
for (IntWritable value: values) {
sum += value.get();
}
// 2 写出
v.set(sum);
context.write(key, v);
}
}Driver
1
2
3
4
5
6
7
8
9
10
11
12
13
14
15
16
17
18
19
20
21
22
23
24
25
26
27
28
29
30
31
32
33
34
35
36
37
38
39
40
41
42package mapreduce.wordcount;
import org.apache.hadoop.conf.Configuration;
import org.apache.hadoop.fs.Path;
import org.apache.hadoop.io.IntWritable;
import org.apache.hadoop.io.Text;
import org.apache.hadoop.mapreduce.Job;
import org.apache.hadoop.mapreduce.lib.input.FileInputFormat;
import org.apache.hadoop.mapreduce.lib.output.FileOutputFormat;
import java.io.IOException;
public class WordCountDriver {
public static void main(String[] args) throws IOException, ClassNotFoundException, InterruptedException {
Configuration conf = new Configuration();
conf.set("fs.defaultFS", "hdfs://localhost:9091");
// 1 获取Job对象
Job job = Job.getInstance(conf);
// 2 设置jar存储位置
job.setJarByClass(WordCountDriver.class);
// 3 关联Map和Reduce类
job.setMapperClass(WordCountMapper.class);
job.setReducerClass(WordCountReducer.class);
// 4 设置Mapper阶段输出数据的key,value类型
job.setMapOutputKeyClass(Text.class);
job.setMapOutputValueClass(IntWritable.class);
// 5 设置最终数据输出的key,value类型
job.setOutputKeyClass(Text.class);
job.setOutputValueClass(IntWritable.class);
// 6 设置输入路径和输出路径
FileInputFormat.setInputPaths(job, new Path(args[0]));
FileOutputFormat.setOutputPath(job, new Path(args[1]));
// 7 提交job
job.waitForCompletion(true);
}
}
3.5. 序列化
3.5.1. 定义
序列化
把内存中的对象转换成字节序列(或其他数据传输协议)以便存储到磁盘(持久化)和网络传输
反序列化
将接收到的字节序列(或其他数据传输协议)或者是磁盘的持久化数据,转换成内存中的对象
3.5.2. 为什么不用Java的序列化
Java的序列化是一个重量级序列化框架(Serializable),一个对象被序列化后,会附带很多额外的信息(各种校验信息,Header,继承体系等),不便于在网络中高效传输。所以Hadoop自己开发了一套序列化机制(Writeable)。
Hadoop 序列化特点:
- 紧凑:高效使用存储空间
- 快速:读写数据的额外开销小
- 可扩展:随着通信协议的升级可升级
- 互操作:支持多种语言的交互
3.5.3. 序列化流程
自定义bean对象实现序列化
步骤:
实现Writeable接口
提供空参构造函数
重写序列化方法
1
2
3
4
5
6// 序列化
public void write(DataOutput dataOutput) throws IOException {
dataOutput.writeLong(up);
dataOutput.writeLong(down);
dataOutput.writeLong(sum);
}重写反序列化方法
1
2
3
4
5
6
7// 反序列化
public void readFields(DataInput dataInput) throws IOException {
// 必须和序列化的顺序一致
up = dataInput.readLong();
down = dataInput.readLong();
sum = dataInput.readLong();
}反序列化与序列化的顺序必须一致
想要把结果显示在文件中,需要重写toString方法
如果需要将自定义的bean放在key中传输,还需要实现Comparable接口,实现compareTo方法,因为MapReduce框架中的Shuffle过程要求key必须可排序。
1
2
3public int compareTo(FLowBean o) {
return this.sum > o.getSum() ? -1: 1;
}
3.5.4. 案例
实现bean
1
2
3
4
5
6
7
8
9
10
11
12
13
14
15
16
17
18
19
20
21
22
23
24
25
26
27
28
29
30
31
32
33
34
35
36
37
38
39
40
41
42
43
44
45
46
47
48
49
50
51
52
53
54
55
56
57
58
59
60
61
62
63
64
65
66
67
68
69
70
71
72
73
74
75package mapreduce.serial;
import org.apache.hadoop.io.Writable;
import java.io.DataInput;
import java.io.DataOutput;
import java.io.IOException;
public class FLowBean implements Writable {
// 上行流量
private Long up;
// 下行流量
private Long down;
// 总流量
private Long sum;
// 空参构造,为了后续反射用
public FLowBean() { super();}
public FLowBean(Long up, Long down) {
this.up = up;
this.down = down;
sum = up + down;
}
// 序列化
public void write(DataOutput dataOutput) throws IOException {
dataOutput.writeLong(up);
dataOutput.writeLong(down);
dataOutput.writeLong(sum);
}
// 反序列化
public void readFields(DataInput dataInput) throws IOException {
// 必须和序列化的顺序一致
up = dataInput.readLong();
down = dataInput.readLong();
sum = dataInput.readLong();
}
public String toString() {
return up + " " + down + " " + sum;
}
public Long getUp() {
return up;
}
public void setUp(Long up) {
this.up = up;
}
public Long getDown() {
return down;
}
public void setDown(Long down) {
this.down = down;
}
public Long getSum() {
return sum;
}
public void setSum(Long sum) {
this.sum = sum;
}
public void set(Long up, Long down) {
this.up = up;
this.down = down;
sum = up + down;
}
}
实现Mapper
1
2
3
4
5
6
7
8
9
10
11
12
13
14
15
16
17
18
19
20
21
22
23
24
25
26
27
28package mapreduce.serial;
import org.apache.hadoop.io.LongWritable;
import org.apache.hadoop.io.Text;
import org.apache.hadoop.mapreduce.Mapper;
import java.io.IOException;
public class FlowBeanMapper extends Mapper<LongWritable, Text, Text, FLowBean> {
Text k = new Text();
FLowBean v = new FLowBean();
protected void map(LongWritable key, Text value, Context context) throws IOException, InterruptedException {
// 获取一行
String line = value.toString();
// 切割
String[] items = line.split(" ");
// 封装
k.set(items[0]);
v.set(Long.parseLong(items[1]), Long.parseLong(items[2]));
// 写出
context.write(k, v);
}
}实现Reducer
1
2
3
4
5
6
7
8
9
10
11
12
13
14
15
16
17
18
19
20
21
22
23
24
25
26
27
28package mapreduce.serial;
import org.apache.hadoop.io.Text;
import org.apache.hadoop.mapreduce.Reducer;
import java.io.IOException;
public class FlowReducer extends Reducer<Text, FLowBean, Text, FLowBean> {
private FLowBean fLowBean = new FLowBean();
protected void reduce(Text key, Iterable<FLowBean> values, Context context) throws IOException, InterruptedException {
long sumup = 0;
long sumdown = 0;
// 累加求和
for (FLowBean v: values
) {
sumup += v.getUp();
sumdown += v.getDown();
}
fLowBean.set(sumup, sumdown);
// 写出
context.write(key, fLowBean);
}
}实现Driver
1
2
3
4
5
6
7
8
9
10
11
12
13
14
15
16
17
18
19
20
21
22
23
24
25
26
27
28
29
30
31
32
33
34
35
36
37
38
39
40package mapreduce.serial;
import org.apache.hadoop.conf.Configuration;
import org.apache.hadoop.fs.Path;
import org.apache.hadoop.io.Text;
import org.apache.hadoop.mapreduce.Job;
import org.apache.hadoop.mapreduce.lib.input.FileInputFormat;
import org.apache.hadoop.mapreduce.lib.output.FileOutputFormat;
import java.io.IOException;
public class FlowDriver {
public static void main(String[] args) throws IOException, ClassNotFoundException, InterruptedException {
Configuration conf = new Configuration();
conf.set("fs.defaultFS", "hdfs://localhost:9091");
// 1 获取job
Job job = Job.getInstance(conf);
// 2 设置jar路径
job.setJarByClass(FlowDriver.class);
// 3 设置mapper和reducer
job.setMapperClass(FlowBeanMapper.class);
job.setReducerClass(FlowReducer.class);
// 4 设置mapper输出类型
job.setMapOutputKeyClass(Text.class);
job.setMapOutputValueClass(FLowBean.class);
// 5 设置最终输出类型
job.setOutputKeyClass(Text.class);
job.setOutputValueClass(FLowBean.class);
// 6 设置输入输出路径
FileInputFormat.setInputPaths(job, new Path("/phonedata"));
FileOutputFormat.setOutputPath(job, new Path("/output"));
// 7 提交job
job.waitForCompletion(true);
}
}
3.6. MapReduce框架原理
3.6.1. InputFormat数据输入
3.6.1.1. 切片与MapTask并行度决定机制
MapTask的并行度决定Map阶段的任务处理并发度,进而影响到整个Job的处理速度。
MapTask并行度决定机制
名词解释:
- 数据块: Block是HDFS物理上把数据分成一块一块
- 数据切片:只是在逻辑上对输入进行分片,并不会在磁盘上将其切片存储
1)一个Job的Map阶段并行度是由客户端在提交Job时的切片数决定的
2)每一个切片分配一个MapTask并行实例处理
3)默认情况下切片大小为块大小BlockSize
3.6.1.2. Job提交流程和切片源码
Job提交
1 | // 7 提交job |
切片源码:
[FileInputFormat.class]
1 | public List<InputSplit> getSplits(JobContext job) throws IOException { |

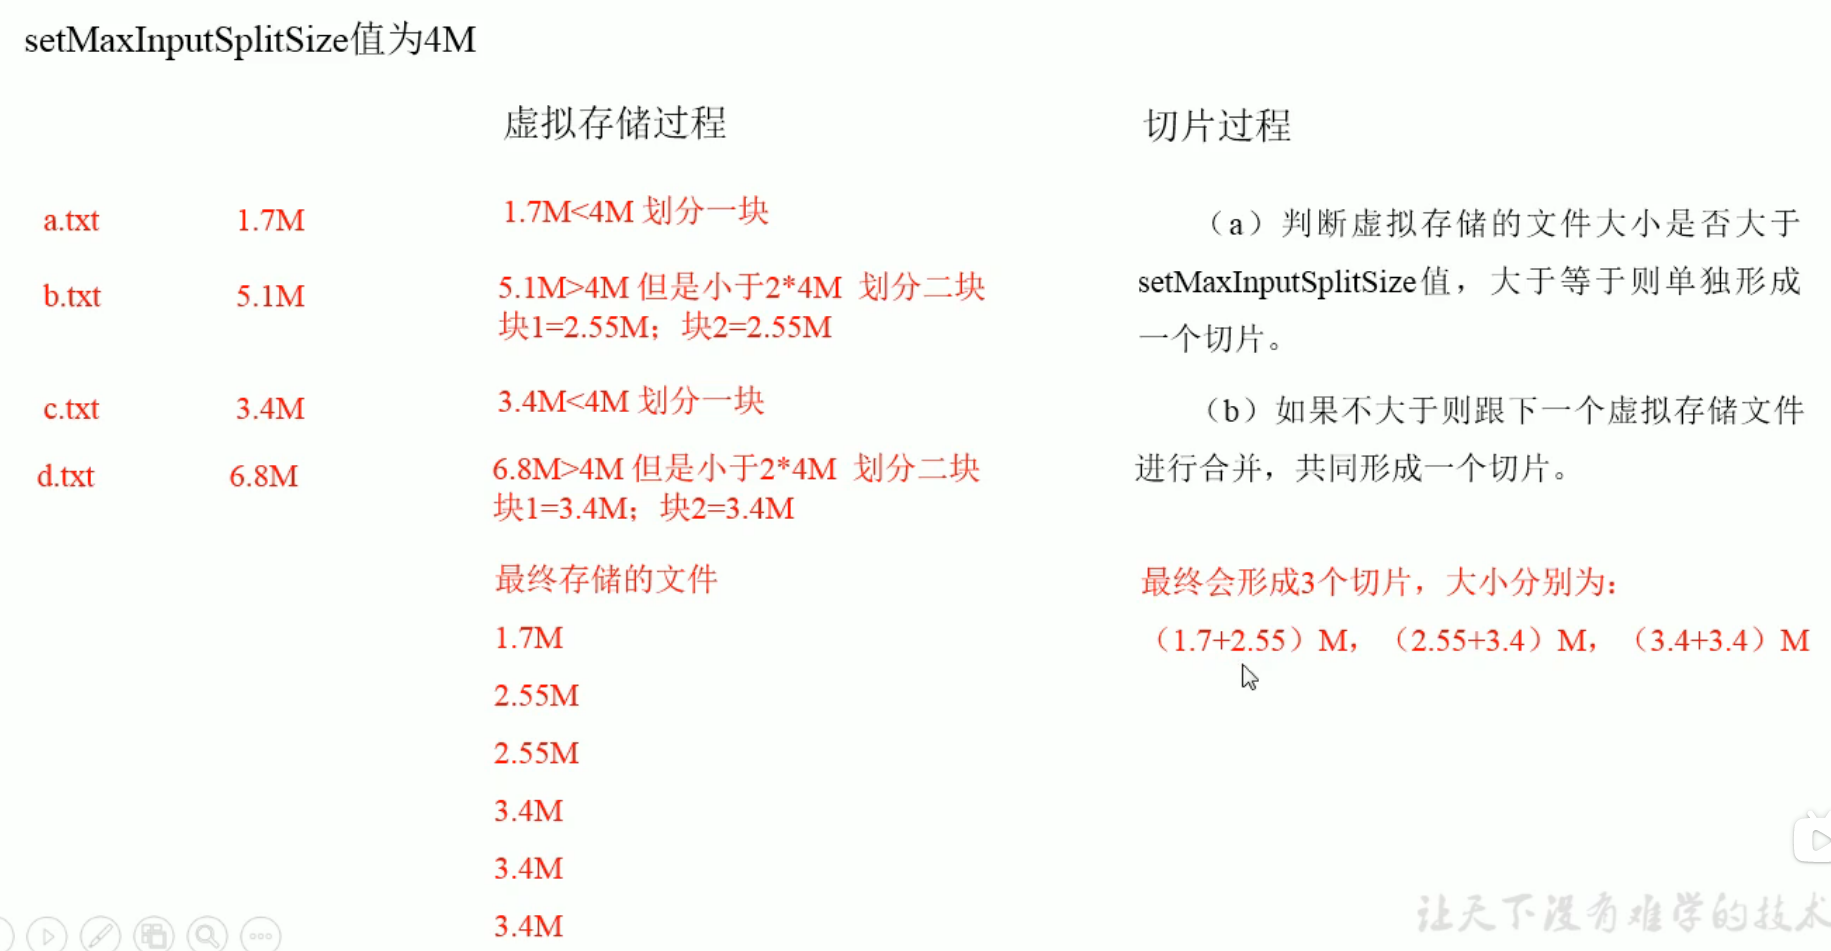
3.6.1.3. CombineTextInputFormat 切片
产生原因
框架默认的TextInputFormat切片机制是对任务按文件进行切片,不管文件多小,都会是一个单独的切片,在有大量的小文件的情况下,就会产生大量的MapTask,效率低下。
因此引入CombineTextInputFormat,来处理小文件过多的情况,它可以将多个小文件从逻辑上划分到一个切片中,这样多个小文件就交给一个MapTask处理。
虚拟存储切片最大值设置
CombineTextInputFormat.setMaxInputSplitSize(job, 4194304);
切片机制
生成切片包括两部分: 虚拟存储过程和切片过程

如何使用:
需要在Driver中添加CombineTextInputFormat的配置
1 | job.setInputFormatClass(CombineTextInputFormat.class); |
3.6.1.4. FileInputFormat实现类
TextInputFormat
是默认的FileInputFormat实现类。按行读取记录。键是存储改行在整个文件中的起始字节偏移量,LongWritable类型。值是这行的内容,不包括终止符,Text类型。
KeyValueTextInputFormat
每一行均为一条记录,被分隔符分割为key,value。可以通过在驱动类中设置
1
conf.set(KeyValueLineRecordReader.KEY_VALUE_SEPERATOR, "\t");
来设置分隔符。默认分隔符是\t
之后修改使用的Format类
1
job.setInputFormatClass(KeyValueTextInputFormat.class);
NLineInputFormat
如果使用NLineInputFormat,代表每个map进程处理的InputSplit不再按照Block块划分,而是按NLineInputFormat指定的行数N来划分。即输入文件的总行数/N=切片数,如果不整除,切片数=商+1。
示例: 有以下4行数据
1
2
3
4Rich learning from
hello world
come from america
welcome如果设置N为2,则每个分片包括2行。开启两个MapTask
1
2(0, Rich learning from)
(19, hello world)另一个
1
2(30, come from america)
(49, welcome)使用: 修改驱动类
1
2NLineInputFormat.setNumLinesPerSplit(job, 3);
job.setInputFormatClass(NLineInputFormat.class);
3.6.1.5. 自定义InputFormat
案例:
需求:
将多个小文件合并成一个SequenceFile文件(SequenceFile文件是Hadoop用来存储二进制形式的key-value的文件格式),SequenceFile里面存储多个文件,存储形式为文件路径+名称为key,文件内容为value。
步骤:
自定义一个类继承FileInputFormat
- 重写isSplitable()方法,返回false,不可切割
- 重写createRecordReader(),创建自定义的RecordReader对象,并初始化
改写RecordReader,实现一次读取一个完整的文件封装成KV
- 采用IO流一次读取一个文件输出到value中,因为设置了不可分片,最终把所有的文件都封装到了value中
- 获取文件路径信息+名称,并设置key
设置Driver
1
2
3
4// 设置输入的inputFormat
job.setInputFormatClass(xxx.class);
// 设置输出的outputFormat
job.setOutputFormatClass(SequenceFileOutputFormat.class);
3.6.2. MapReduce 工作流程
map阶段

reduce阶段:

3.6.3. Shuffle机制
Map方法之后Reduce之前的数据处理过程称为Shuffle机制。

3.6.3.1. Partition分区
将结果分别存入不同的文件(分区)中。
默认分区
1
2
3
4
5
6
7
8public class HashPartitioner<K, V> extends Partitioner<K, V> {
public HashPartitioner() {
}
public int getPartition(K key, V value, int numReduceTasks) {
return (key.hashCode() & 2147483647) % numReduceTasks;
}
}默认分区根据key的hashcode对ReduceTasks个数取模得到。用户无法控制哪个key存储到哪个分区。
自定义分区步骤
自定义类继承Partitioner,重写getPartitioner()方法
在job中设置自定义Partitioner
1
job.setPartitionerClass(CustomPartitioner.class);
自定义Partitioner后,要根据自定义Partitioner的逻辑设置相应数量的ReduceTask
1
job.setNumReduceTasks(n);
3.6.3.2. 自定义Partitioner案例
需求: 根据手机号的前3为进行分文件存储
自定义分区类
1 | public class ProvincePartitioner extends Partitioner<Text, FLowBean> { |
修改driver
1
2
3// 设置分区类,及分区个数
job.setPartitionerClass(ProvincePartitioner.class);
job.setNumReduceTasks(5);结果
1
2
3
4
5
6
7
8$ hadoop fs -ls /output
Found 6 items
-rw-r--r-- 3 bruce supergroup 0 2020-11-19 15:52 /output/_SUCCESS
-rw-r--r-- 3 bruce supergroup 15648 2020-11-19 15:52 /output/part-r-00000
-rw-r--r-- 3 bruce supergroup 21877 2020-11-19 15:52 /output/part-r-00001
-rw-r--r-- 3 bruce supergroup 20247 2020-11-19 15:52 /output/part-r-00002
-rw-r--r-- 3 bruce supergroup 39426 2020-11-19 15:52 /output/part-r-00003
-rw-r--r-- 3 bruce supergroup 286408 2020-11-19 15:52 /output/part-r-00004总结:
- 如果
setNumReduceTasks()数量大于getPartition中设置的数量,则会产生几个空的输出文件 - 如果 1<
setNumReduceTasks()<getPartition中设置的数量,则会报异常 - 如果
setNumReduceTasks()数量=1,则只会产生一个文件 - 分区号必须从0开始
- 如果
3.6.3.3. WritableComparable 排序
MapTask和ReduceTask均会对数据按照key进行排序。任何应用程序中的数据均会被排序,不管逻辑上是否需要。
默认排序是按照字典顺序排序,实现方式是快排。
对于MapTask,他会将处理的结果暂时放到环形缓冲区中,当环形缓冲区使用率达到一定阈值(80%)后,在对缓冲区中的数据进行一次快排,并将数据溢写到磁盘上,数据处理完后,它将磁盘上的所有文件进行归并排序。
对于ReduceTask,它从每个MapTask上远程拷贝相应的数据文件,如果文件大小超过阈值,则溢写到磁盘否则存储在内存中。如果磁盘文件数目达到一定阈值,则进行一次归并排序生成一个更大的文件;如果内存中问价大小或数目超过一定阈值,则进行一次合并后将数据溢写到磁盘上。当所有数据拷贝完后,ReduceTask统一对磁盘上的所有数据进行一次归并排序。
排序分类
部分排序
MapReduce根据记录的键对数据集排序。保证输出的每个文件内部有序
全排序
最终输出结果只有一个文件,且文件内部有序。实现方式是只设置一个ReduceTask。但该方法在处理大型文件时效率极低,因为一台机器处理所有文件,完全丧失了MapReduce所提供的并行架构。
辅助排序:(GroupingComparator分组)
在Reduce端对key进行分组。应用于:在接收的key为bean对象时,想让一个或几个字段相同(全部字段比较不相同)的key进入同一个reduce方法时,可采用分组排序。
二次排序
在自定义排序过程中,如果compareTo中的判断条件为两个即为二次排序。
自定义WritableComparable步骤
- bean对象作为key传输,实现WritableComparable接口,重写compareTo方法。
3.6.3.4. 自定义WritableComparable 排序案例(全排序)
定义bean
1
2
3
4
5
6
7
8
9
10
11
12
13
14
15
16
17
18
19public class FlowBean implements WritableComparable<FlowBean> {
....
//其他部分与序列化的代码相同,主要的不同是实现了其他接口,并实现compareTo方法
public int compareTo(FlowBean bean) {
int res = 0;
if (sum > bean.getSum()) {
res = -1;
} else if (sum < bean.getSum()) {
res = 1;
}
return res;
}
.
.
.
}实现Mapper
1
2
3
4
5
6
7
8
9
10
11
12
13
14
15
16
17
18
19
20
21
22public class FlowCountSortMapper extends Mapper<LongWritable, Text, FlowBean, Text> {
FlowBean flowBean = new FlowBean();
Text v = new Text();
protected void map(LongWritable key, Text value, Context context) throws IOException, InterruptedException {
// 1. 获取一行
String line = value.toString();
// 2 切割
String[] items = line.split(" ");
// 3 封装对象
String phoneNum = items[0];
long up = Long.parseLong(items[1]);
long down = Long.parseLong(items[2]);
flowBean.set(up, down);
v.set(phoneNum);
// 4 写出
context.write(flowBean, v);
}
}实现reducer
1
2
3
4
5
6
7
8
9
10
11public class FlowCountSortReducer extends Reducer<FlowBean, Text, Text, FlowBean> {
protected void reduce(FlowBean key, Iterable<Text> values, Context context) throws IOException, InterruptedException {
for (Text value: values
) {
context.write(value, key);
}
}
}
3.6.3.5. 自定义WritableComparable 排序案例(分区排序)
在上一节的代码中添加分区的代码
1 | public class ProvincePartitioner extends Partitioner<FlowBean, Text> { |
修改driver
1 | job.setPartitionerClass(ProvincePartitioner.class); |
3.6.3.6. Combiner 合并
Combiner是MR程序中Mapper和Reducer之外的一种组件
Combiner的父类是Reducer
Combiner和Reducer的区别在于运行的位置:
Combiner是在每一个MapTask所在的节点运行
Reducer是接收全局所有Mapper的输出结果
Combiner的意义在于每一个MapTask的输出进行局部汇总,以减小网络传输量
Combiner能够应用的前提是不能影响最终的业务逻辑,而且,Combiner的输出kv应该跟Reducer的输入kv类型要对应起来
3.6.3.7. Combiner 案例
需求
统计过程中对每一个MapTask的输出进行局部汇总,以减少网络传输量。
方案一: 自定义Combiner
-
1
2
3
4
5
6
7
8
9
10
11
12
13
14
15public class WordCountCombiner extends Reducer<Text, IntWritable, Text, IntWritable> {
IntWritable v = new IntWritable();
protected void reduce(Text key, Iterable<IntWritable> values, Context context) throws IOException, InterruptedException {
int sum = 0;
for (IntWritable value: values
) {
sum += value.get();
}
v.set(sum);
context.write(key, v);
}
} 在driver中关联Combiner
1
2// Combiner
job.setCombinerClass(WordCountCombiner.class);结果
1
2
3
4
5
6
7
8
9
10
11Map input records=8
Map output records=12
Map output bytes=116
Map output materialized bytes=87
Input split bytes=101
Combine input records=12
Combine output records=7
Reduce input groups=7
Reduce shuffle bytes=87
Reduce input records=7
Reduce output records=7Combiner将Map的输出减少到7
方案二:
直接将Reducer关联为Combiner,因为做的操作是相同的,所以这里可以这么用
1 | // Combiner |
结果
1 | Map input records=8 |
3.6.3.8. GroupingComparator
需求
求出每个订单中最贵的商品
思路
- 利用”订单id“和成交金额作为key,可以将Map阶段读取到的所有订单数据按id升序,如果id相同在按照金额降序排序,发送到Reducer
- 在Reducer端利用GroupingComparator将订单id相同的kv聚合成组,然后取第一个即是该订单中最贵的商品
分组排序步骤:
自定义类继承writableCompatator
重写compare方法
1
2
3
4
public int compare(WritableComparable a, WritableComparable b) {
return super.compare(a, b);
}
创建一个构造将比较对象的类传给父类
1
2
3public OrderGroupingComparator() {
super(OrderBean.class, true);
}
案例
bean对象
这里的排序,是先根据id进行升序排序,如果价格相同,则按照价格降序排序
1
2
3
4
5
6
7
8
9
10
11
12
13
14
15
16
17
18
19
20
21
22
23
24
25
26
27
28
29
30
31
32
33
34
35public class OrderBean implements WritableComparable<OrderBean> {
private int order_id;
private double price;
public OrderBean() {}
public int compareTo(OrderBean o) {
int res = 0;
// 先按照id升序,如果相同,按价格降序
if (order_id > o.getOrder_id()) {
res = 1;
} else if (order_id < o.getOrder_id()) {
res = -1;
} else {
if (price > o.getPrice()) {
res = -1;
} else if(price < o.getPrice()) {
res = 1;
}
}
return res;
}
public void write(DataOutput dataOutput) throws IOException {
dataOutput.writeInt(order_id);
dataOutput.writeDouble(price);
}
public void readFields(DataInput dataInput) throws IOException {
order_id = dataInput.readInt();
price = dataInput.readDouble();
}
// ..... 不重要的部分删去了
}
Mapper
Mapper中将数据从文件中读出,然后将字符串中的编号和价格拿出来,组成一个bean对象,由于不需要使用value,因此value传了一个NullWritable对象。
1
2
3
4
5
6
7
8
9
10
11
12
13
14
15
16
17
18
19public class OrderMapper extends Mapper<LongWritable, Text, OrderBean, NullWritable> {
OrderBean bean = new OrderBean();
protected void map(LongWritable key, Text value, Context context) throws IOException, InterruptedException {
// 获取一行 // 000001 Pdt_01 222.8
String line = value.toString();
// 切割
String[] items = line.split(" ");
// 为bean赋值
bean.set(Integer.parseInt(items[0]), Double.parseDouble(items[2]));
// 写出
context.write(bean, NullWritable.get());
}
}Reducer
Reducer写出key和每个key中的第一个value,这里由于是把id+价格作为key,因此将同id不同价格的记录全部打印了,
1
2
3
4
5
6
7public class OrderReducer extends Reducer<OrderBean, NullWritable, OrderBean, NullWritable> {
protected void reduce(OrderBean key, Iterable<NullWritable> values, Context context) throws IOException, InterruptedException {
context.write(key, NullWritable.get());
}
}GroupingComparator
根据第三条的问题,我们需要添加一个GroupingComparator。它做的事情是把id相同的记录处理成一个key,这样之后Reducer再处理的时候就不会有问题了。
1
2
3
4
5
6
7
8
9
10
11
12
13
14
15
16
17
18
19
20
21
22public class OrderGroupingComparator extends WritableComparator {
public OrderGroupingComparator() {
super(OrderBean.class, true);
}
public int compare(WritableComparable a, WritableComparable b) {
// 只要id相同,就认为是相同的key
OrderBean beana = (OrderBean) a;
OrderBean beanb = (OrderBean) b;
int res = 0;
if (beana.getOrder_id() > beanb.getOrder_id()) {
res = 1;
} else if (beana.getOrder_id() < beanb.getOrder_id()) {
res = -1;
}
return res;
}
}
3.6.4. MapTask工作机制

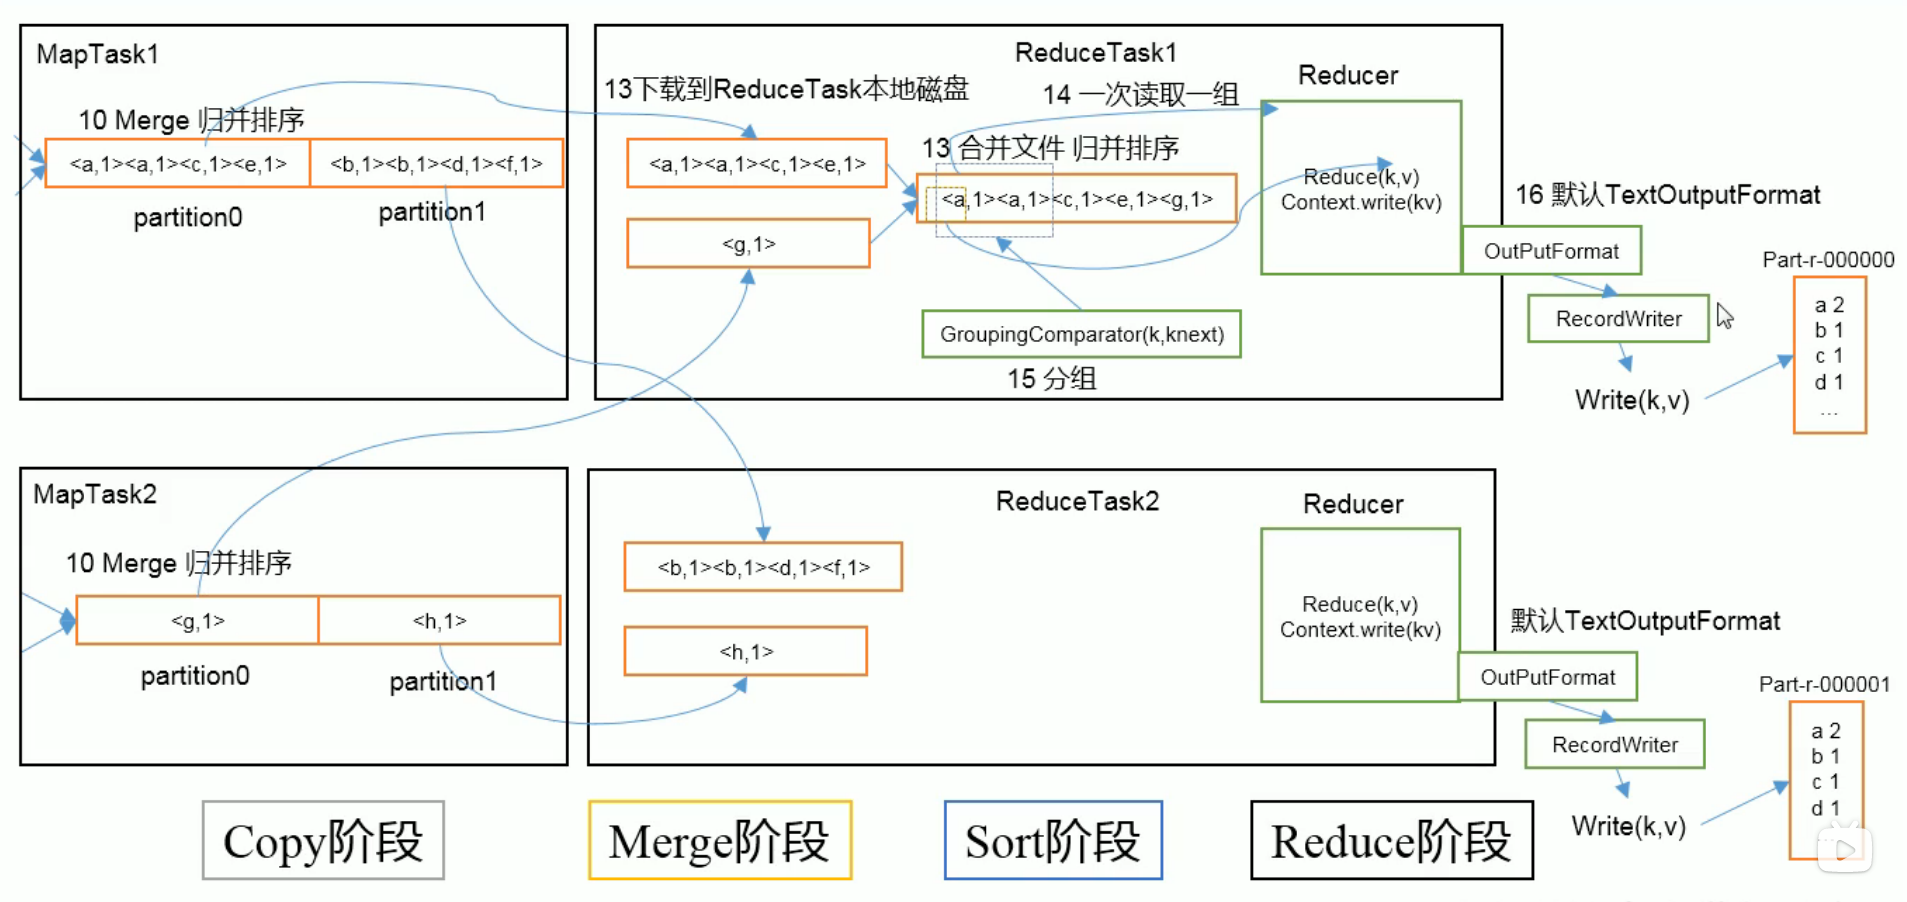
3.6.5. ReduceTask工作机制
工作机制
设置ReduceTask并行度(个数)
与MapTask的并发数由切片数决定不同,ReduceTask数量的决定是可以手动设置的
1
2// 默认是1,可以手动设置
job.setNumReduceTasks(4);注意事项
ReduceTask=0,表示没有Reduce阶段,输出文件个数与Map个数一致
ReduceTask默认值是1,所以输出文件个数为一个
如果数据分布不均匀,就有可能在Reduce阶段产生数据倾斜
ReduceTask数量,需要考虑业务逻辑,有些情况下,需要计算全局汇总结果,就只能有1个ReduceTask
具体多少个ReduceTask,需根据集群性能而定
如果分区数不是1,但ReduceTask是1,是否执行分区过程?不执行。
因为在MapTask源码中,执行分区的前提是判断ReduceNum个数是否大于1,不大于1不执行

3.6.6. OutputFormat数据输出
3.6.6.1. OutputFormat接口实现类
OutputFormat是MapReduce输出的基类,所有实现MapReduce输出都实现了OutputFormat接口。
文本输出TextOutputFormat
默认的输出是TextOutputFormat,它把每条记录写为文本行。它的键和值可以是任意类型,因为TextOutputFormat调用的是toString方法,把他们转换为字符串。
SequenceFileOutPutFormat
将SequenceFileOutPutFormat输出作为后续MapReduce任务的输入,它的格式紧凑,很容易被压缩。
自定义OutputFormat
3.6.6.2. 自定义OutputFormat
使用场景
为了实现控制问价的输出路径和输出格式,可以自定义OutputFormat
例如:要在MapReduce程序中根据数据的不同输出两类结果袋不同目录,这类灵活的输出需求可以通过自定义OutPutFormat来实现
自定义OutputFormat步骤
- 自定义一个类继承FileOutPutFormat
- 改写RecordWriter,具体改写输出数据的方法write()
- 在驱动类中进行关联
案例:
需求:过滤日志,将包含baidu.com的日志输出到baidu.log, 将其他的日志输出到other.log
完整代码路径
mapper
1
2
3
4
5
6
7
8
9
10public class FilterMapper extends Mapper<LongWritable, Text, Text, NullWritable> {
protected void map(LongWritable key, Text value, Context context) throws IOException, InterruptedException {
// http://www.baidu.com
context.write(value, NullWritable.get());
}
}reducer
1
2
3
4
5
6
7
8
9
10
11
12public class FilterReducer extends Reducer<Text, NullWritable, Text, NullWritable> {
protected void reduce(Text key, Iterable<NullWritable> values, Context context) throws IOException, InterruptedException {
for (NullWritable v: values
) {
context.write(key, NullWritable.get());
}
}
}OutPutFormat
1
2
3
4
5
6public class FilterOutputFormat extends FileOutputFormat<Text, NullWritable> {
public RecordWriter<Text, NullWritable> getRecordWriter(TaskAttemptContext job) throws IOException, InterruptedException {
return new FRecordWriter(job);
}
}Writer
1
2
3
4
5
6
7
8
9
10
11
12
13
14
15
16
17
18
19
20
21
22
23
24
25
26
27
28
29
30
31
32
33
34
35public class FRecordWriter extends RecordWriter<Text, NullWritable> {
FSDataOutputStream fosbaidu;
FSDataOutputStream fosother;
public FRecordWriter(TaskAttemptContext job) {
try {
// 1 获取文件系统
FileSystem fs = FileSystem.get(job.getConfiguration());
// 2 创建输出到baidu.log的输出流
fosbaidu = fs.create(new Path("/baidu.log"));
// 3 创建输出到other.log的输出流
fosother = fs.create(new Path("/other.log"));
} catch (IOException e) {
e.printStackTrace();
}
}
public void write(Text text, NullWritable nullWritable) throws IOException, InterruptedException {
// 判断key中是否有baidu,如果有,写出到baidu.log否则,写出到other.log
if (text.toString().contains("baidu")) {
fosbaidu.write(text.toString().getBytes());
} else {
fosother.write(text.toString().getBytes());
}
}
public void close(TaskAttemptContext taskAttemptContext) throws IOException, InterruptedException {
IOUtils.closeStream(fosbaidu);
IOUtils.closeStream(fosother);
}
}Driver
1
2
3
4
5
6
7
8
9
10
11
12
13
14
15
16
17
18
19
20
21
22
23
24
25
26
27
28
29
30
31
32
33
34
35
36public class FilterDriver {
public static void main(String[] args) throws IOException, ClassNotFoundException, InterruptedException {
Configuration conf = new Configuration();
conf.set("fs.defaultFS", "hdfs://localhost:9091");
// 1 获取Job对象
Job job = Job.getInstance(conf);
// 2 设置jar存储位置
job.setJarByClass(FilterDriver.class);
// 3 关联Map和Reduce类
job.setMapperClass(FilterMapper.class);
job.setReducerClass(FilterReducer.class);
// 4 设置Mapper阶段输出数据的key,value类型
job.setMapOutputKeyClass(Text.class);
job.setMapOutputValueClass(NullWritable.class);
// 5 设置最终数据输出的key,value类型
job.setOutputKeyClass(Text.class);
job.setOutputValueClass(NullWritable.class);
// 关联自定义的输出格式类
job.setOutputFormatClass(FilterOutputFormat.class);
// 6 设置输入路径和输出路径
FileInputFormat.setInputPaths(job, new Path("/log"));
// 虽然自定义了OutPutFormat,但是因为OutPutFormat继承自FileOutPutFormat
// 而FileOutPutFormat要输出一个_SUCCESS文件,所以这里还需要指定一个目录。
FileOutputFormat.setOutputPath(job, new Path("/output"));
// 7 提交job
job.waitForCompletion(true);
}
}
3.6.7. Join的多种应用
3.6.7.1. Reduce Join
Reduce Join工作原理:
Map端主要工作:为来自不同表或文件的key/value对,打标签以区别不同来源的记录。然后用连接字段作为key,其余部分和新加的标志作为value,最后进行输出。
Reduce端的主要工作:以连接字段作为key的分组以完成,我们只需要在每一个分组中将来自不同文件的记录(Map阶段已经打标签)。最后合并就ok了。
3.6.7.2. Reduce Join 案例
需求:

将两张表join
Map需要处理的事情
- 获取输入文件类型
- 获取输入数据
- 不同文件分别处理
- 封装Bean对象输出
Reduce
- Reduce方法缓存订单数据集合和产品表,然后合并
bean
1
2
3
4
5
6
7
8
9
10
11
12
13
14
15
16
17
18
19
20
21
22
23
24
25
26
27
28
29
30
31
32
33
34public class TableBean implements Writable {
// id pid amount
// pid pname
private String id;
private String pid;
private int amount;
private String pname;
private String flag; //标记是哪个表
public TableBean() {}
public void write(DataOutput dataOutput) throws IOException {
dataOutput.writeUTF(id);
dataOutput.writeUTF(pid);
dataOutput.writeInt(amount);
dataOutput.writeUTF(pname);
dataOutput.writeUTF(flag);
}
public void readFields(DataInput dataInput) throws IOException {
id = dataInput.readUTF();
pid = dataInput.readUTF();
amount = dataInput.readInt();
pname = dataInput.readUTF();
flag = dataInput.readUTF();
}
// ... 省略部分代码
public String toString() {
return id + " " + amount + " " + pname ;
}
}Mapper
1
2
3
4
5
6
7
8
9
10
11
12
13
14
15
16
17
18
19
20
21
22
23
24
25
26
27
28
29
30
31
32
33
34
35
36
37
38
39
40
41
42
43
44
45public class TableMapper extends Mapper<LongWritable, Text, Text, TableBean> {
String name;
TableBean bean = new TableBean();
protected void setup(Context context) throws IOException, InterruptedException {
// 获取文件名称
FileSplit split = (FileSplit) context.getInputSplit();
name = split.getPath().getName();
}
protected void map(LongWritable key, Text value, Context context) throws IOException, InterruptedException {
// id pid amount
// 1001 01 1
// pid pname
// 01 小米
// 02 华为
// 03 格力
Text k = new Text();
String line = value.toString();
String[] items = line.split(" ");
if (name.equals("amount_table")) { // amount
bean.setId(items[0]);
bean.setPid(items[1]);
bean.setAmount(Integer.parseInt(items[2]));
bean.setPname("");
bean.setFlag("amount");
k.set(items[1]);
} else { // company
bean.setId("");
bean.setPid(items[0]);
bean.setAmount(0);
bean.setPname(items[1]);
bean.setFlag("company");
k.set(items[0]);
}
context.write(k, bean);
}
}Reducer
1
2
3
4
5
6
7
8
9
10
11
12
13
14
15
16
17
18
19
20
21
22
23
24
25
26
27
28
29
30
31
32
33
34
35
36
37
38
39
40
41public class TableReducer extends Reducer<Text, TableBean, TableBean, NullWritable> {
protected void reduce(Text key, Iterable<TableBean> values, Context context) throws IOException, InterruptedException {
// 存储产品数量结合
ArrayList<TableBean> beans = new ArrayList<TableBean>();
// 存放公司集合
TableBean company = new TableBean();
for (TableBean bean:values
) {
if (bean.getFlag().equals("amount")) {
TableBean dst = new TableBean();
try {
BeanUtils.copyProperties(dst, bean);
beans.add(dst);
} catch (IllegalAccessException e) {
e.printStackTrace();
} catch (InvocationTargetException e) {
e.printStackTrace();
}
} else {
try {
BeanUtils.copyProperties(company, bean);
} catch (IllegalAccessException e) {
e.printStackTrace();
} catch (InvocationTargetException e) {
e.printStackTrace();
}
}
}
for (TableBean bean: beans
) {
bean.setPname(company.getPname());
context.write(bean, NullWritable.get());
}
}
}执行结果
1
2
3
4
5
6
7$ hadoop fs -cat /output5/part-r-00000
1004 4 小米
1001 1 小米
1005 5 华为
1002 2 华为
1006 6 格力
1003 3 格力缺点
在这种方式中,合并的操作是在Reduce阶段完成,Reduce端的处理压力太大,Map节点的运算负载则很低,资源利用率不高,且在Reduce阶段极易产生数据倾斜。
解决方案: Map端实现数据合并。
3.6.7.3. Map Join
使用场景
适用于有一张小表(可放入内存中),一张大表的情况。
方法:采用 DistributedCache
在Mapper的setup阶段,将文件读取到缓存集合中
在驱动函数中加载缓存
// 缓存普通文件到Task运行节点
job.addCacheFile(new URI(“file://sss”));
需要注意的事情
DistributedCacheDriver缓存文件
加载缓存数据: job.addCacheFile(new URI(“file://sss”));
Map端join的逻辑不需要Reduce阶段,设置ReduceTask数量为0
1
job.setNumReduceTasks(0);
读取缓存的文件数据:
setup()方法处理
3.6.7.4. Map Join 案例
Mapper
1
2
3
4
5
6
7
8
9
10
11
12
13
14
15
16
17
18
19
20
21
22
23
24
25
26
27
28
29
30
31
32
33
34
35
36
37
38
39
40
41
42
43
44public class DistributedCacheMapper extends Mapper<LongWritable, Text, Text, NullWritable> {
HashMap<String, String> cpMap = new HashMap<String, String>();
Text k = new Text();
protected void setup(Context context) throws IOException, InterruptedException {
// 缓存小表
BufferedReader reader = new BufferedReader(new InputStreamReader(new FileInputStream("company_table"), "UTF-8"));
String line;
while (StringUtils.isNotEmpty(line = reader.readLine())) {
// pid pname
// 1. 切割
String[] items = line.split(" ");
cpMap.put(items[0], items[1]);
}
IOUtils.closeStream(reader);
}
protected void map(LongWritable key, Text value, Context context) throws IOException, InterruptedException {
// id pid amount
// pid pname
String line = value.toString();
String[] items = line.split(" ");
// 获取pid
String pid = items[1];
// 从map中取值
String pidName = cpMap.get(pid);
// 拼接
line = line + " " + pidName;
k.set(line);
// 写出
context.write(k, NullWritable.get());
}
}Driver
1
2
3
4
5
6
7
8
9
10
11
12
13
14
15
16
17
18
19
20
21
22
23
24
25
26
27
28
29
30
31
32
33
34
35public class DistributedDriver {
public static void main(String[] args) throws IOException, ClassNotFoundException, InterruptedException, URISyntaxException {
Configuration conf = new Configuration();
conf.set("fs.defaultFS", "hdfs://localhost:9091");
// 1 获取Job对象
Job job = Job.getInstance(conf);
// 2 设置jar存储位置
job.setJarByClass(DistributedDriver.class);
// 3 关联Map和Reduce类
job.setMapperClass(DistributedCacheMapper.class);
//job.setReducerClass(TableReducer.class);
// 没有reduce阶段了
// // 4 设置Mapper阶段输出数据的key,value类型
// job.setMapOutputKeyClass(Text.class);
// job.setMapOutputValueClass(TableBean.class);
// 5 设置最终数据输出的key,value类型
job.setOutputKeyClass(Text.class);
job.setOutputValueClass(NullWritable.class);
// 加载缓存数据
job.addCacheFile(new Path("/join/company_table").toUri());
job.setNumReduceTasks(0);
// 6 设置输入路径和输出路径
FileInputFormat.setInputPaths(job, new Path("/join2"));
FileOutputFormat.setOutputPath(job, new Path("/output6"));
// 7 提交job
job.waitForCompletion(true);
}
}结果
1
2
3
4
5
6
7$ hadoop fs -cat /output6/part-m-00000
1001 01 1 小米
1002 02 2 华为
1003 03 3 格力
1004 01 4 小米
1005 02 5 华为
1006 03 6 格力
3.6.8. 数据清洗(ELT)
在运行核心业务MapReduce程序之前,往往要先对数据进行清洗,清洗掉不符合要求的数据。清晰的过程只需运行Mapper程序,不需要运行Reduce程序。
Mapper
1
2
3
4
5
6
7
8
9
10
11
12
13
14
15
16
17
18
19
20
21
22
23
24
25
26
27
28
29
30
31
32
33public class LogMapper extends Mapper<LongWritable, Text, Text, NullWritable> {
protected void map(LongWritable key, Text value, Context context) throws IOException, InterruptedException {
// 读取一行
String line = value.toString();
// 解析数据
boolean result = parseLog(line, context);
if (!result) {
// 不符合要求,直接返回
return;
}
context.write(value, NullWritable.get());
}
private boolean parseLog(String line, Context context) {
String[] fields = line.split(" ");
if (fields.length > 11) {
// 计数器,为了自定义一些打印输出
context.getCounter("map", "true").increment(1);
return true;
} else {
// 计数器
context.getCounter("map", "false").increment(1);
return false;
}
}
}Driver
1
2
3
4
5
6
7
8
9
10
11
12
13
14
15
16
17
18
19
20
21
22
23
24
25
26
27
28
29
30public static void main(String[] args) throws IOException, ClassNotFoundException, InterruptedException {
Configuration conf = new Configuration();
conf.set("fs.defaultFS", "hdfs://localhost:9091");
// 1 获取Job对象
Job job = Job.getInstance(conf);
// 2 设置jar存储位置
job.setJarByClass(LogDriver.class);
// 3 关联Map和Reduce类
job.setMapperClass(LogMapper.class);
//job.setReducerClass(TableReducer.class);
// 没有reduce阶段了
// // 4 设置Mapper阶段输出数据的key,value类型
// job.setMapOutputKeyClass(Text.class);
// job.setMapOutputValueClass(TableBean.class);
// 5 设置最终数据输出的key,value类型
job.setOutputKeyClass(Text.class);
job.setOutputValueClass(NullWritable.class);
// 6 设置输入路径和输出路径
FileInputFormat.setInputPaths(job, new Path("/logelt"));
FileOutputFormat.setOutputPath(job, new Path("/output7"));
// 7 提交job
job.waitForCompletion(true);
}
}控制台输出
1
2
3
4
5
6// Mapper中添加的计数器
....
map
false=5
true=25
....
4. Hadoop 数据压缩
压缩技术可以有效减少底层存储系统(HDFS)读写字节数。压缩提高了网络带宽和磁盘的效率。在运行MR程序时,I/O操作,网络数据传输,Shuffle和Merge要花大量时间,尤其是数据规模很大和工作负载密集的情况下,因此数据压缩就显得十分重要。
压缩使用的基本原则:
- 运算密集型的job,少用压缩
- IO密集型的job,多用压缩
4.1. MR支持的压缩格式
| 压缩格式 | Hadoop自带? | 算法 | 文件扩展名 | 是否可切分 | 换成压缩格式后,原来的程序是否需要修改 |
|---|---|---|---|---|---|
| DEFAULT | 是 | DEFAULT | .default | 否 | 不需要 |
| Gzip | 是 | DEFAULT | .gz | 否 | 不需要 |
| bzip2 | 是 | bzip2 | .bz2 | 是 | 不需要 |
| LZO | 否 | LZO | .lzo | 是 | 需要建立索引格式,还需指定输入格式 |
| Snappy | 否 | Snappy | .snappy | 否 | 不需要 |
为了支持多种压缩/解压缩算法,Hadoop引入了编/解码器:
| 压缩格式 | 编/解码器 |
|---|---|
| EFAULT | org.apache.hadoop.io.compress.DefaultCodec |
| gzip | org.apache.hadoop.io.compress.GzipCodec |
| bzip2 | org.apache.hadoop.io.compress.BZip2Codec |
| LZO | org.apache.hadoop.io.compress.LzopCodec |
| Snappy | org.apache.hadoop.io.compress.SnappyCodec |
压缩性能:
| 压缩算法 | 原始文件大小 | 压缩文件大小 | 压缩速度 | 解压速度 |
|---|---|---|---|---|
| gzip | 8.3G | 1.8G | 17.5MB/s | 58MB/s |
| bzip2 | 8.3G | 1.1G | 2.4MB/s | 9.5MB/s |
| LZO | 8.3G | 2.9G | 49.4MB/s | 74.6MB/s |
Snappy:
Compared to the fastest mode of zlib, Snappy is an order of magnitude faster for most inputs, but the resulting compressed files are anywhere from 20% to 100% bigger. On a single core of a Core i7 processor in 64-bit mode, Snappy compresses at about 250 MB/sec or more and decompresses at about 500 MB/sec or more.
4.2. 压缩位置的选择

4.3. 压缩参数设置
| 参数 | 默认值 | 阶段 | 建议 |
|---|---|---|---|
| io.compression.codecs 在core-site.xml中配置 |
org.apache.hadoop.io.compress.DefaultCodec org.apache.hadoop.io.compress.GzipCodec org.apache.hadoop.io.compress.BZip2Codec |
输入阶段 | Hadoop使用文件扩展名 判断是否支持某种编码器 |
| mapreduce.map.output.compress 在mapred-site.xml中配置 |
false | mapper输出 | 参数设置为true启用压缩 |
| mapreduce.map.output.compress.codec 在mapred-site.xml中配置 |
org.apache.hadoop.io.compress.DefaultCodec | mapper输出 | 企业多使用LZO或Snappy在此阶段 |
| maperduce.output.fileoutputformat. compress 在mapred-site.xml中配置 |
false | reducer输出 | 参数设置为true启用压缩 |
| maperduce.output.fileoutputformat. compress.codec 在mapred-site.xml中配置 |
org.apache.hadoop.io.compress.DefaultCodec | reducer输出 | 使用标准工具编解码,如gizp和bzip2 |
| maperduce.output.fileoutputformat. compress.type 在mapred-site.xml中配置 |
RECORD | reducer输出 | SequenceFile输出使用的压缩类型:None和Block |
4.4. 数据流的压缩/解压缩
CompressionCodec有两个方法可以实现压缩/解压缩
压缩: createOutputStream(OutputStreamout)
解压: createInputStream(InputStreamin)
1 | public class TestCompress { |
4.4.1. Map输出端压缩
在Driver中添加
1 | // 开启map端输出压缩 |
执行结果
1 | hadoop fs -ls /output |
Map输出端进行压缩,不会影响最终的输出
4.4.2. Reduce输出端压缩
在Driver中添加
1 | // 设置Reducer端输出压缩开启 |
执行结果
1 | $ hadoop fs -ls /output |
5. Yarn资源调度器
Yarn是一个资源调度器,负责为运算程序提供服务器运算资源。
5.1. 基本架构
Yarn主要由ResourceManager, NodeManager, ApplicationMaster和Container的组件构成。
5.2. Yarn工作机制

5.3. 资源调度器
Hadoop作业调度器主要有三种: FIFO,Capacity Scheduler,和Fair Scheduler。Hadoop2.7.2 默认调度器是Capacity Scheduler
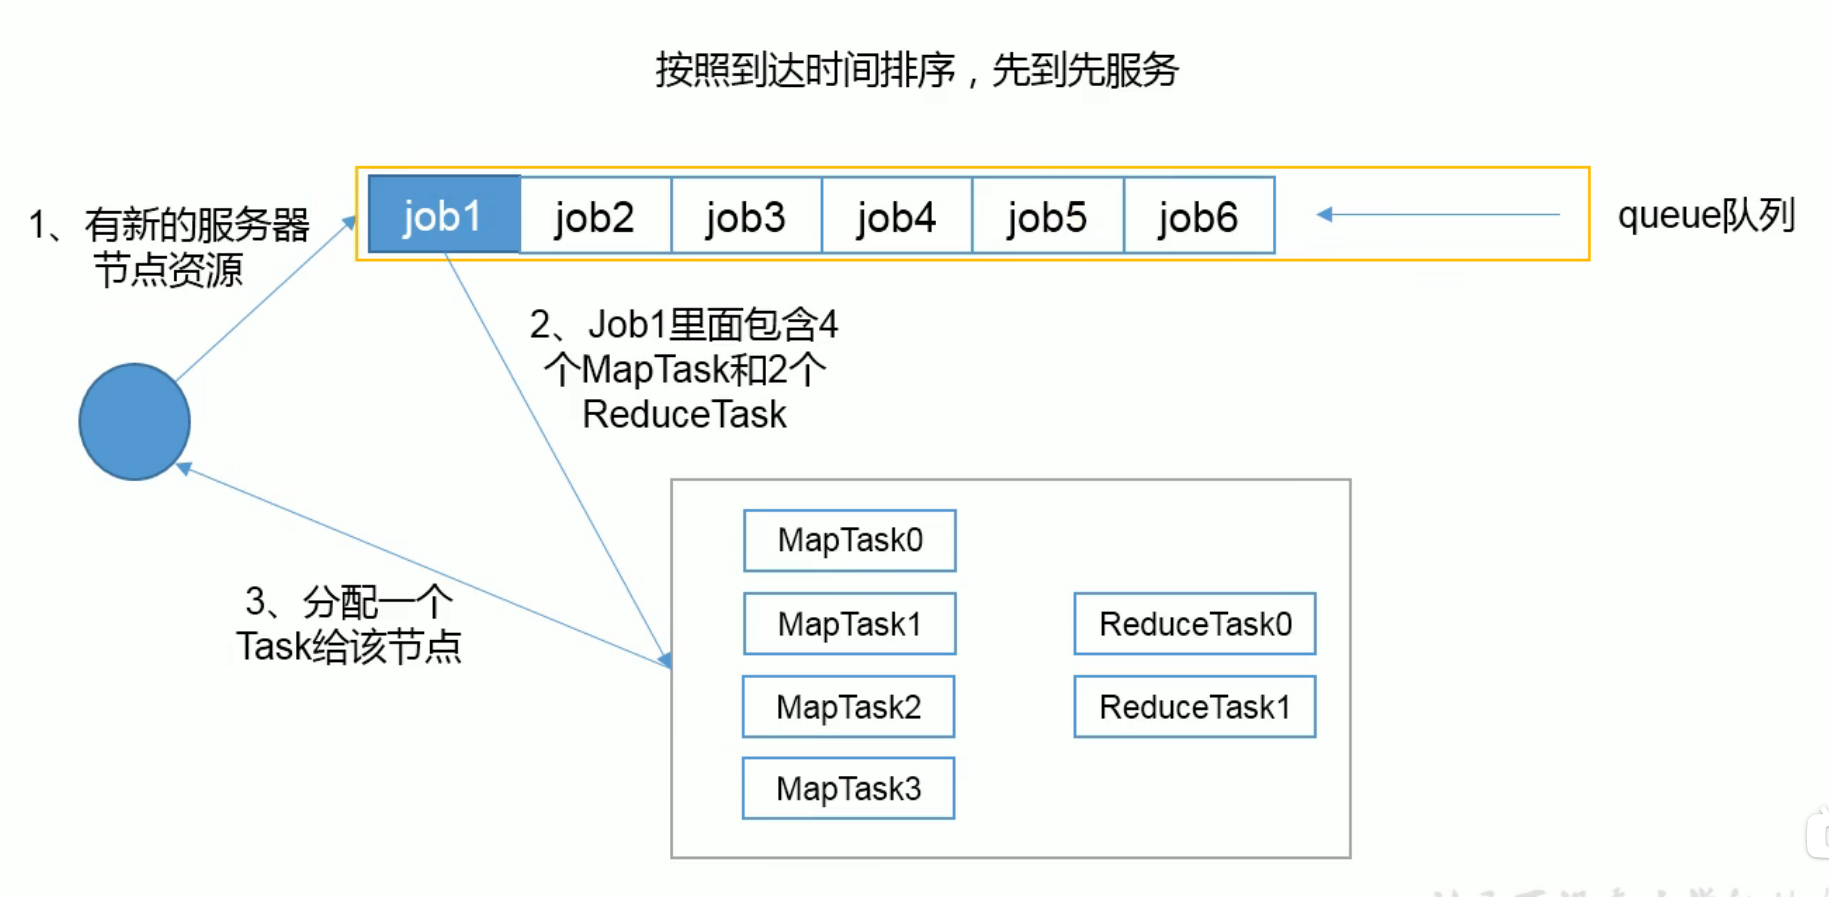
FIFO
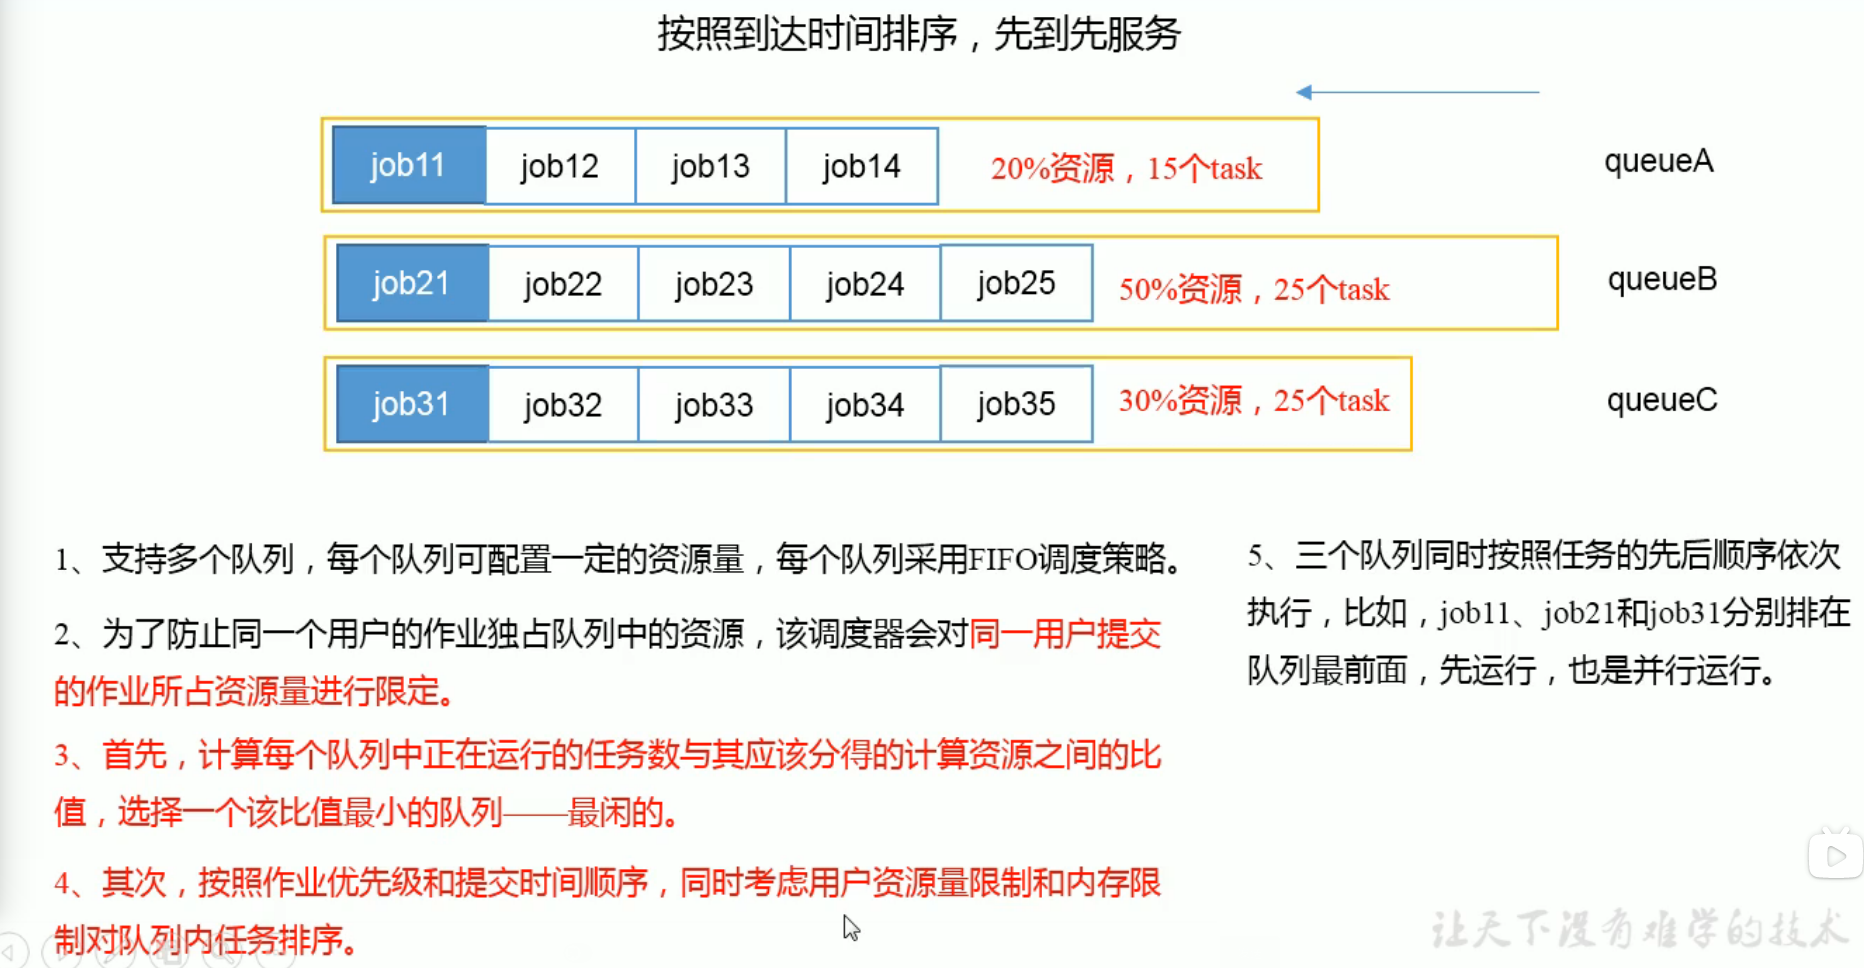
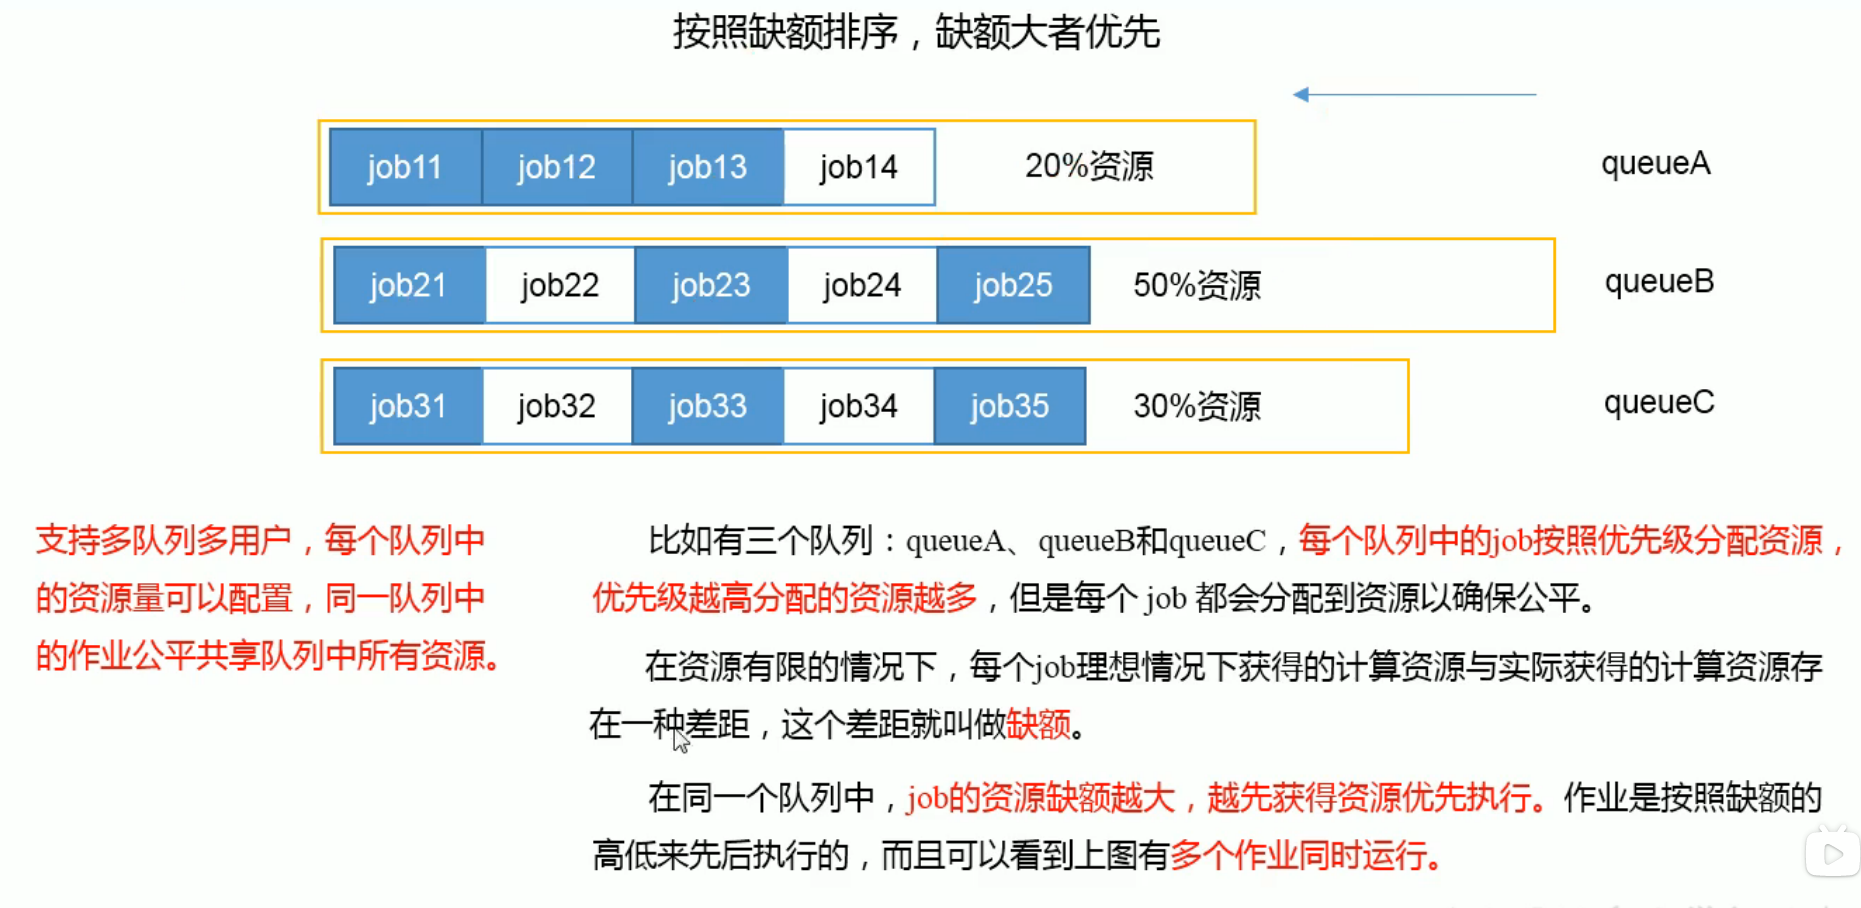
Capacity Scheduler(容量调度器)
Fair Scheduler


5.4. 任务的推测执行
作业的完成时间取决于最慢的任务完成时间
一个作业由若干个Map任务和Reduce任务构成,因硬件老化等原因,某些任务可能运行十分缓慢。
推测执行机制
发现拖后腿任务,比如某个任务运行速度远慢于任务平均速度。为拖后腿任务启动一个备份任务,同时运行。谁先运行完,采用谁的结果。
执行推测任务的前提条件
每个Task只能有一个备份任务
当前job已经完成的Task必须不小于0.05(%5)
开启推测执行参数设置。mapred-site.xml文件中是默认打开的。
1
<name>mapreduce.reduce.speculative</name>
不能启用推测执行机制的情况
- 任务间存在严重的负载倾斜
- 特殊任务,比如任务向数据库中写数据
5.5. 推测执行算法原理

6. Hadoop企业优化
6.1. MapReduce跑的慢的原因
MapReduce效率瓶颈在于两点:
计算机性能
CPU,内存,磁盘,网络
IO操作优化
- 数据倾斜
- Map和Reduce数设置不合理
- Map运行时间太长,导致Reduce等待过久
- 小文件过多
- 大量不可分块的超大文件
- 溢写次数过多
- Merge次数过多
6.2. MapReduce优化方法
优化方法主要从六个方面考虑:数据输入,Map阶段,Reduce阶段,IO传输,数据倾斜问题和常用的调优参数。
6.2.1. 数据输入
- 合并小文件:在执行任务前将小文件进行合并,大量的小文件会产生大量的Map任务。
- 采用CombineTextInputFormat来作为输入,解决输入端大量小文件场景。
6.2.2. Map阶段
- 减少溢写次数:通过调整io.sort.mb(环形缓冲区的大小)及sort.spill.percent参数,增大出发spill的内存上限,减少spill次数,从而减少磁盘IO
- 减少合并(Merge)次数:通过调整io.sort.factor参数,增大Merge的文件数目,减少Merge次数
- 在Map之后,在不影响业务逻辑的前提下,先进行combine处理,减少IO
6.2.3. Reduce阶段
- 设置合理Map和Reduce数
- 设置Map,Reduce共存:调整slowstart.completedmaps参数,是Map运行到一定程度后,Reduce也开始运行,减少Reduce的等待时间
- 规避使用Reduce:因为Reduce在用于连接数据集的时候会产生大量的网络消耗
- 合理设置Reduce端的Buffer:默认情况下,数据达到一个阈值的时候,Buffer中的数据会写入磁盘,然后Reduce会从磁盘中获得所有的数据。可以通过参数设置,使得Buffer中的一部分数据可以直接输送到Reduce,从而能减少IO开销:
mapred.job.reduce.input.buffer.percent默认为0.0.当该值大于0时,会保留指定比例的内存读Buffer中的数据直接给Reduce使用。
6.2.4. IO传输
- 采用数据压缩的方式:减少网络IO的时间。(LZO,Snappy)
- 使用SequenceFile二进制文件
6.2.5. 数据倾斜
数据倾斜
- 频率倾斜:某一区域的数据量远大于其他区域
- 大小倾斜:部分记录的大小远大于平均值
解决方法
抽样和范围分区
通过对原始数据进行抽样得到的结果集来预设分区边界值。
自定义分区
Combine
采用Map Join,尽量避免Reduce Join
6.2.6. 常用调优参数
6.3. 小文件优化方法
HDFS上每个文件都需要在NameNode上建立索引,每个索引大小约为150byte
6.3.1. 解决方法
- 在数据采集时,将小文件或小批数据合并后再上传
- 在业务处理之前,在HDFS上使用MapReduce程序对小文件进行合并
- 在MapReduce处理时,可采用CombineTextInputFormat提高效率
Hadoop Archive
文件归档成HAR文件
Sequence File
由一系列的二进制KV组成
CombineTextInputFormat
将多个文件合并成一个Split,另外,他会考虑数据的存储位置
开启JVM重用
对于大量的小文件job,可以开启JVM重用,会减少45%运行时间
原理: 一个Map运行在JVM上,开启重用,该Map在JVM上运行完毕后,JVM继续运行其他Map(类似线程池)
设置: mapreduce.job.jvm.numtasks值在10-20之间
7. 扩展案例
7.1. 倒序索引(多job串联)
多job串联即多个MapReduce任务,下一个任务使用上一个任务的结果
- 输入数据及预期结果

Mapper1
1
2
3
4
5
6
7
8
9
10
11
12
13
14
15
16
17
18
19
20
21
22
23
24
25
26
27
28
29public class OneIndexMapper extends Mapper<LongWritable, Text, Text, IntWritable> {
String name;
protected void setup(Context context) throws IOException, InterruptedException {
// 获取文件名称
FileSplit inputSplit = (FileSplit) context.getInputSplit();
name = inputSplit.getPath().getName();
}
Text k = new Text();
IntWritable v = new IntWritable(1);
protected void map(LongWritable key, Text value, Context context) throws IOException, InterruptedException {
// 1 获取一行
String line = value.toString();
// 2 切割
String[] fields = line.split(" ");
// 3 写出
for (String word : fields
) {
k.set(word+"--"+name);
context.write(k, v);
}
}
}Reducer1
1
2
3
4
5
6
7
8
9
10
11
12
13
14
15
16
17
18
19public class OneIndexReducer extends Reducer<Text, IntWritable, Text, IntWritable> {
IntWritable value = new IntWritable();
protected void reduce(Text key, Iterable<IntWritable> values, Context context) throws IOException, InterruptedException {
int sum = 0;
for (IntWritable v: values
) {
sum += v.get();
}
value.set(sum);
context.write(key, value);
}
}Driver1
1
2
3
4
5
6
7
8
9
10
11
12
13
14
15
16
17
18
19
20
21
22
23
24
25
26
27
28
29
30
31
32public class OneIndexDriver {
public static void main(String[] args) throws IOException, ClassNotFoundException, InterruptedException {
Configuration conf = new Configuration();
conf.set("fs.defaultFS", "hdfs://localhost:9091");
// 1 获取Job对象
Job job = Job.getInstance(conf);
// 2 设置jar存储位置
job.setJarByClass(OneIndexDriver.class);
// 3 关联Map和Reduce类
job.setMapperClass(OneIndexMapper.class);
job.setReducerClass(OneIndexReducer.class);
// 4 设置Mapper阶段输出数据的key,value类型
job.setMapOutputKeyClass(Text.class);
job.setMapOutputValueClass(IntWritable.class);
// 5 设置最终数据输出的key,value类型
job.setOutputKeyClass(Text.class);
job.setOutputValueClass(IntWritable.class);
// 6 设置输入路径和输出路径
FileInputFormat.setInputPaths(job, new Path("/index"));
FileOutputFormat.setOutputPath(job, new Path("/output1"));
// 7 提交job
job.waitForCompletion(true);
}
}Mapper2
1
2
3
4
5
6
7
8
9
10
11
12
13
14
15
16
17
18
19
20
21
22
23public class TwoIndexMapper extends Mapper<LongWritable, Text, Text, Text> {
Text k = new Text();
Text v = new Text();
protected void map(LongWritable key, Text value, Context context) throws IOException, InterruptedException {
// ads--a 3
// ads--b 2
// ads--c 1
// 1 获取一行
String line = value.toString();
// 2 切割
String[] fields = line.split("--");
k.set(fields[0]);
v.set(fields[1]);
context.write(k, v);
}
}Reducer2
1
2
3
4
5
6
7
8
9
10
11
12
13
14
15public class TwoIndexReducer extends Reducer<Text, Text, Text, Text> {
Text v = new Text();
protected void reduce(Text key, Iterable<Text> values, Context context) throws IOException, InterruptedException {
StringBuffer tmp = new StringBuffer();
for (Text value: values
) {
tmp.append(value.toString().replace("\t", "-->")+"\t");
}
v.set(tmp.toString());
context.write(key, v);
}
}Driver2
1
2
3
4
5
6
7
8
9
10
11
12
13
14
15
16
17
18
19
20
21
22
23
24
25
26
27
28
29
30
31
32public class TwoIndexDriver {
public static void main(String[] args) throws IOException, ClassNotFoundException, InterruptedException {
Configuration conf = new Configuration();
conf.set("fs.defaultFS", "hdfs://localhost:9091");
// 1 获取Job对象
Job job = Job.getInstance(conf);
// 2 设置jar存储位置
job.setJarByClass(TwoIndexDriver.class);
// 3 关联Map和Reduce类
job.setMapperClass(TwoIndexMapper.class);
job.setReducerClass(TwoIndexReducer.class);
// 4 设置Mapper阶段输出数据的key,value类型
job.setMapOutputKeyClass(Text.class);
job.setMapOutputValueClass(Text.class);
// 5 设置最终数据输出的key,value类型
job.setOutputKeyClass(Text.class);
job.setOutputValueClass(Text.class);
// 6 设置输入路径和输出路径
FileInputFormat.setInputPaths(job, new Path("/index2"));
FileOutputFormat.setOutputPath(job, new Path("/output2"));
// 7 提交job
        job.waitForCompletion(true);
}
}
